
Arthroscopy of the Shoulder
The skills of triangulation and manipulation of instruments within the joint cavity can be transferred from knowledge of other large joint arthroscopy, such as the knee. Valuable experience of shoulder arthroscopy may be obtained if every shoulder is arthroscoped before an open stabilization procedure. This can be justified because the information gained is valuable both to the surgeon and patient. The patient gains because an intimate knowledge of the pathologic anatomy of the shoulder is displayed, and hence the surgery can be tailored accordingly. The surgeon gains by increasing his skill within the joint and adding to his experience of the variation of anatomy. The range of normal anatomy within the shoulder joint is far greater than that of the knee. This normal variance may be learned only by experience. Unfortunately, because of a lack of appreciation of this variability, a lot of unnecessary arthroscopic surgery has been done within the shoulder.
Equipment
For diagnostic arthroscopy, standard knee arthroscopic instrumentation can be used. The standard 30-degree 4-mm knee arthroscope is the most generally useful scope. Small-diameter and short shoulder arthroscopes are available but have not been found to be either necessary or useful. The shoulder is a very large-volume joint, and light through a small scope may be inadequate. Television with a compact camera system is a highly desirable, if not an almost essential, requirement for more complex shoulder arthroscopic procedures. A diagnostic arthroscopy may sometimes be done with inflow and outflow of fluid through the scope alone. If bleeding obscures the view, however, then a drain must be inserted through a second puncture to increase the throughflow. This may be done by using a knee arthroscopy drainage needle attached to cannula drainage tubing or a larger bore outflow canular. Five-millimeter disposable plastic can-ulars are useful, because they have a rubber diaphragm, -which allows instrumentation and probing to gain more information.
Position of Patient
Lateral Position
The most commonly used position for shoulder arthroscopy is with the patient in the midlateral position, affected side uppermost (Fig. 10-1). The trunk is stabilized by a pelvic support posteriorly and a chest post anteriorly. General anesthesia is most commonly used, although it is certainly possible using scalene block anesthesia alone. Traction is applied to the affected arm using a pediatric skin traction set.
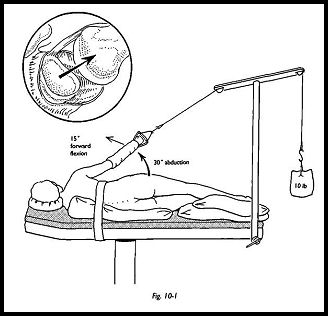
The sponge rubber type is preferred to those using a skin adhesive, because skin avulsion has been described in rheumatoid patients. The rubber type is also reusable. Approximately 10 lb in weight are used for the average patient via a balanced traction system. This is most easily applied using a pulley attached to a drip stand fixed to the end of the operating table. The optimal position is approximately 30 degrees of abduction and 15 degrees of forward flexion. This position is a compromise between giving the best view for shoulder arthroscopy and that for subacromial bursoscopy; the less the arm is abducted, the better the subacromial view. The skin is prepared in the usual way, and the surgical field is surrounded by waterproof drapes.
Beach Chair Position
Some surgeons prefer the beach chair position for all shoulder arthroscopic work, and it is certainly the position of choice if arthroscoping the shoulder before stabilization. The patient does not have to be repositioned and redraped, but surgery can continue immediately after the arthroscopy, so there is a great saving of time. The patient is placed supine on the operating table with the head on a neurosurgical headpiece and then flexed at the hips, giving a relaxed, reclining position like a beach chair. Traction is helpful with this position and may be applied using an assistant to pull down on the limb toward the hip or by using balanced traction through a bivalved elbow shell. This position has been clearly described by Resch and Betk.1
It is useful at this stage to infiltrate the puncture sites with bupivacaine and adrenaline 0.5 percent to reduce bleeding and postoperative pain. In the average patient, 20 ml are used, and after infiltration for portal sites, the remaining 10 ml are used to inflate the glenohumeral joint. If local anesthetic has been used for a scalene block, then these volumes must be reduced accordingly.
The shoulder joint is a deeply placed structure, and entry is not as easy as with the knee. When first learning the technique of shoulder arthroscopy, it may be an advantage to inflate the joint before insertion of the scope. As experience is gained, however, then the joint can be entered dry.
Technique
The Posterior Portal
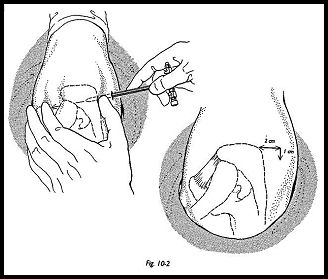
The posterior portal is the most commonly used utility entry site for the arthroscope (Fig. 10-2). It is situated one thumb's breadth inferior to the angle of the acromion and approximately 1.5 cm medial to the angle of the acromion. A 5-mm puncture wound is made parallel to the skin tension lines. In this position, the incision should be vertical. The middle finger is placed on the coracoid, and the arthroscope sheath with blunt cannula is pushed through skin and subcutaneous tissue toward the tip of the coracoid marked by the middle finger. This gives the approximate line of the glenohumeral joint.
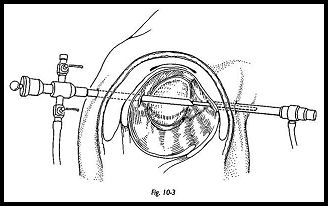
While making this approach, it is wise to deviate to the lateral rather than the medial side. Resistance will then be felt as the tip of the blunt obturator hits the capsule on the posterior surface of the humeral head. The obturator is then "walked" medially over the sphere of the humeral head until the edge of the glenoid is palpated. With practice, the glenohumeral joint can be easily found, and then with moderate force, the sheath and obturator is pushed into the joint (Fig. 10-3). If the joint has been preinflated, then the flow of fluid will confirm joint entry.
Light source, saline inflow, and camera are assembled in the usual way. A gravity feed distension of the joint with saline from a tall drip stand is usually adequate for maintaining pressure for diagnostic arthroscopy alone. The shoulder may be washed out by removing the scope from the sheath and allowing the joint fluid to evacuate on several occasions; the joint may then be reinflated. This should give an adequate view. If the joint cannot be adequately visualized because of poor view due to bleeding, then adequate throughflow must be established. If inspection alone is adequate rather than probing, then a second portal ¦wide-bore needle connected to drainage tubing is adequate to allow flow of fluid. More usually, however, much more information can be obtained by manipulating intra-articular structures with a probe, and this may be done through a second, formal portal.
Second Portal Placement
A second portal may be required, either to establish drainage or to allow placement of instruments or probe. It is easiest to establish this second portal from -within—out. The anterior portal is the most common utility portal for these purposes. The joint is inspected, and the telescope driven into the triangular area bordered by the long-headed biceps, the anterior border of the glenoid, and the superior border of the subscapularis. The light can be seen transluminating the skin anteriorly. The telescope is removed, leaving the sheath in place; the sharp objurator is driven through with hand pressure to just under the skin and then pushed through a second puncture wound anteriorly. The 5-mm cannula is then mated over the 4-mm obturator and railroaded back into the joint. This method ensures that the cannula enters the joint at exactly the correct point.
Inspection of the Joint
A standard routine of inspection should be used so that all positive and negative findings may be recorded. The long head of the biceps is the most prominent intra-articular structure and is a good starting point for orientation. The biceps tendon is inspected from its origin at the apex of the glenoid labrum to its disappearance into the biceps grove on the anterolateral aspect of the humerus (Fig. 10-4). Sometimes a mesotendon may be seen, which is a normal finding. The posterior labrum is inspected, as is the posterior glenoid recess, which leads into the infraglenoid recess and the inferior capsule are also inspected. The scope is then swept over the posterior humeral head to inspect the bare area and the posterior rotator cuff insertion and posterior humeral head articular cartilage. The under-surface of the rotator cuff is inspected by rotating the 30 degree scope to look superiorly. The anterior labrum is then assessed and palpated with a probe, as is the anterior capsule. The upper border of subscapularis is seen and appears to be an intra-articular structure with the middle glenohumeral ligament crossing its upper border.
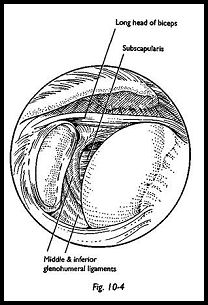
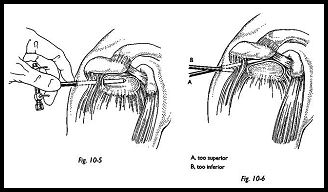
The subscapularis appears so prominendy because the superoanterior capsule is a thin and flimsy structure and the positive interarticular fluid pressure distends die capsule out through the rotator interval—that is, the space between the anterior surface of the supraspinatus and the superior edge of the subscapularis. Although the middle gleno-humeral ligament, which crosses the medial subscapularis, is a constant finding, the middle glenohumeral ligament itself is very variable in thickness and structure. The inferior glenohumeral ligament is the most important for anterior shoulder stability and can be extremely variable in its attachment to the anteroinferior labrum. The anterior synovial recesses are inspected in great detail and again are extremely variable. If a loose body is suspected, then it is in this anterior synovial recess where a loose body is most likely to be found and may have to be coaxed out of its position. An assessment of stability may be gained by trying to sweep the arthroscope down the anterior border of the glenoid, direcdy into the infraglenoid recess (Fig. 10-5). In the normal tight shoulder, this can be difficult or only just possible. However, if there is some degree of laxity, then the scope can be swept down the whole anterior wall of the glenoid and easily into the inferior recess.
Subacromial Bursoscopy This is an essential part of the complete arthroscopic examination of the shoulder. Following a standard glenohumeral arthroscopy, the telescope is then removed, and the blunt obturator is inserted into the cannula and withdrawn into the subcutaneous tissue (Fig. 10-6). The same posterior skin portal is used. A finger is placed over the anterior bony margin of the acromion, then the obturator and canula are advanced toward this point. While pushing the obturator forward, it is felt to give slightly, and the bursa is entered. The position can be checked by swishing the obturator laterally and medially, flicking under the coracoacromial ligament. Sometimes the sensation of give is not felt, and there is some doubt as to whether the bursa has been entered. Sweeping the obturator laterally from this point usually ensures entry into the bursa.
The bursa is a very anterolateral structure and may not extend far posteriorly; therefore, to be sure of bursal entry, the tip of the trocar must pass well anteriorly. The obturator is then withdrawn, the scope inserted, and inflow fluid switched on.
Bleeding can be a problem in the bursa, and an increased flow pressure may be required. Lack of bony landmarks can make orientation within this space difficult, but feeling the bony tip of the acromion with the scope can be useful, and palpation with the finger from the outside can aid orientation. Needle insertion on either side of the cora-coacromial ligament may be helpful in orientation. The whole of the bursa is inspected into the lateral recess and under the surface of the coracoacromial ligament, and the acromion is assessed for inflammatory change and wear. The bursal surface of the rotator cuff is inspected for inflammatory change and evidence of partial or full thickness and tearing and calcification.
A useful technical point to note is that if, on entering the bursa there is fluid flowback, then this indicates that there may well be a full-thickness tear and that any fluid that has entered the bursa must have flowed through from the glenohumeral joint via a rotator cuff tear. When the examination is complete, the bursa is flushed out, and the skin puncture is left unsutured to prevent formation of any localized hematoma.2
References
- Resell H, Betk E: Arthroscopy of the shoulder. Springer- Verlag, New York, 1992
- Copeland SA, Williamson D: Suturing of arthroscopy wounds. J Bone Joint Surg [Br] 18:145, 1988
Suggested Reading
Detrisac DA, Johnson LL: Arthroscopic Shoulder Anatomy: Pathological and Surgical Implications. Slack, Thorofare, NJ, 1988
