Shoulder Ultrasound Technique
Lennard Funk, 2008
Indications
Indications for ultrasound scanning of the shoulder include:
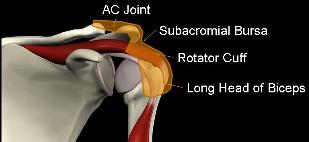
- Suspicion of rotator cuff pathology
- Long Head of Biceps pathology such as tendonitis or tears, subluxation or dislocations.
- Acromioclavicular Joint pathology such as arthritis, osteolysis and subluxations.
- Glenohumeral pathologies such as:
- Glenohumeral arthritis (osteophytes).
- Glenohumeral effusions.
- Rarely, labral pathology .
- Bony lesions such as Hill-Sachs Lesions
Equipment.
Good quality grey scale ultrasound machine with high frequency linear array transducer at 10-15mHz. The better the quality and generally the price of the machine the higher the quality and thus easier it is to perform ultrasound examinations and interpret the images. Lower quality machines make interpretation of subtle pathologies much more difficult and not advisable for the inexperienced.
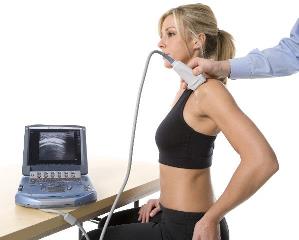
Position.
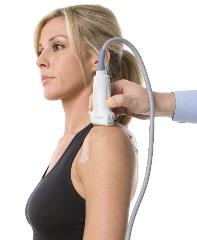
- The patient is seated with the shoulder and arm fully expo
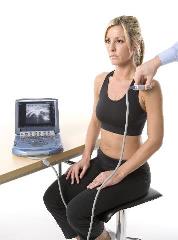 sed from neck to elbow with free mobility of the arm.
 - A chair should be used without armrests and narrow back support.
- The patient faces the screen with the examiner standing or seated on the side of the shoulder to be scanned. The patient is then included in the examination and the examiner is able to discuss the findings and scan with the patient keeping them involved during the procedure.
- Ideally the examiner holds the probe in their left hand for a right shoulder with the right arm free to control the buttons on the machine and likewise holding the probe in their right hand for scanning a left shoulder with the examiner's left arm free to control the buttons on the machine.
- Adequate gel and tissue wipes should be easily accessible and available.
Ultrasound Probe Technique
The technique for holding the ultrasound probe is like a tripod or large pen. The probe is held between the thumb, index and middle fingers with the little finger extended to rest on the patient. This creates a triangular (tripod) configuration, making it more stable to hold the probe on the patient and move around without any loss of positioning.
Sequential Examination
1. Longhead of Biceps Transverse.
The coracoid is the lighthouse to the shoulder and the landmark to start at. The probe is placed on the coracoid in the horizontal direction perpendicular to the longhead of biceps.
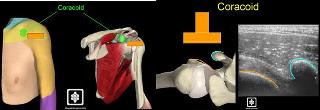
Once the coracoid is clearly seen the probe is moved laterally to find the longhead of biceps in the biceps groove lying in the valley between the lesser tuberosity and greater tuberosity.
As the humeral head in this area is quite convex the probe does need to be rocked in the sagittal plane to eliminate anisotropy. The longhead of biceps can then be followed superiorly and inferiorly.
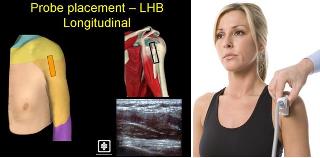
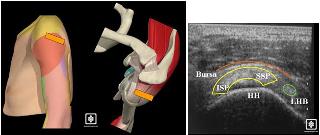
2. Long Head of Biceps Longitudinal.
The probe is then rotated 90° for a longitudinal view of the biceps tendon. The probe can be moved medially and laterally to find the valley between the lesser and greater tuberosities where the biceps lies and again anisotropy is eliminated to get a good view of the biceps with the collagen fibres clearly seen within the biceps tendon. The biceps can again be followed superiorly and inferiorly.
3. Subscapularis Tendon and Muscle Transverse.
The probe is then changed to the horizontal position again, thus giving a longitudinal view of the subscapularis muscle and tendon as it inserts at the lesser tuberosity of the humerus. The upper third of the subscapularis is more tendinous with the lower two thirds attachments being muscular. Subscapularis tears generally start superiorly, working their way inferiorly, therefore the tendinous portion should be identified first and easily. The arm can be rotated internally and externally to improve visualisation of the subscapularis tendon and muscle.
The probe is then rotated 90° for a transverse view of the subscapularis and the probe moved medially and laterally to get an impression of the muscular tendinous unit.
4. Supraspinatus.
The patient is then asked to place their hand on their hip with the shoulder adducted and internally rotated as much as is comfortable for the patient (similar to putting your hand in your back pocket position).
Bearing in mind that the supraspinatus runs in a plane at 30° to the coronal plane of the body the probe should be placed for a longitudinal view of the suprsapinatus between 30° and 60° to the coronal axis of the plane of the body. This should give a good view of the greater tuberosity footprint area and superior articular surface of the humeral head. The probe can then be moved from antero-medial to postero-lateral, i.e. from the anterior leading edge of supraspinatus towards the infraspinatus tendon. The commonest area for supraspinatus tears is in this region.
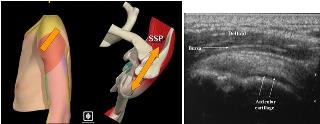
The probe is then rotated 90° for a transverse view of the supraspinatus and anterior portion of the infraspinatus tendons (superior cuff). The probe can then be moved medially and laterally as well as antero-medial and postero-lateral for a good impression of this area. Further medial movement is limited by the acromium.
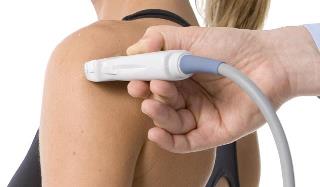
5. Posterior Cuff. 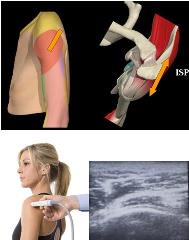
The patient's arm is brought back by their side with their forearm on their lap. The posterior/inferior cuff (infraspinatus and Teres Minor) lies below the spine of the scapular posteriorly. The scapular spine can be palpated and the probe placed in a longitudinal direction just below the spine of the scapular. The probe is moved laterally to view the posterior gleno-humeral articular surface and insertion of infraspinatus and Teres Minor to the humerus. The arm can be rotated to improve visualisation of this area. The Teres Minor tends to attach to a prominent tubercle at the posterior humerus which can be seen on the transverse view helping to delineate the infraspinatus from Teres Minor.
Hill Sachs lesion, i.e. compression fractures with dislocation of the posterior humeral head can sometimes be seen and measured on ultrasound underlying the posterior cuff.
6. Acromioclavicular Joint.
The acromioclavicular joint can easily be palpated at the top of the shoulder. A large amount of gel is placed over the joint and the probe placed in the long axis of the clavicle over the AC joint for a good view of the AC joint. The probe can be moved anterior and posterior for an overall impression of the joint.